Sensor Station: Difference between revisions
(→Functions: Removed bad table) |
(img) |
||
| (13 intermediate revisions by 2 users not shown) | |||
| Line 1: | Line 1: | ||
{{Spacecraft_Module | {{Spacecraft_Module | ||
| Name = Sensor Station | | Name = Sensor Station | ||
| Picture = dp_SensorConsole.png | | Picture = dp_SensorConsole.png | ||
| Mass = ? | |||
| Mass = | |||
| Materials = | | Materials = | ||
| Tools = | | Tools = | ||
}} | }} | ||
[[Sensor]]s work like a three-dimensional radar to detect objects in space around the [[spacecraft]] or [[building]]. Sensors provide information vital to the operation of [[Weapon_Bay|weapon bay]]s and [[transporter]]s. | |||
The | The '''sensor station''' operator can assist the pilot and the weapon officer by using the sensor's lock-on capability. | ||
Controls are activated by clicking on the console using the hand cursor. Controls also have corresponding keyboard equivalents. Help about using the hand cursor and a table showing the key commands for this station can be found on the [[Controls# | Controls are activated by clicking on the console using the hand cursor. Controls also have corresponding keyboard equivalents. Help about using the hand cursor and a table showing the key commands for this station can be found on the [[Controls#Sensor_Station]] page. | ||
==Console== | ==Console== | ||
[[File:SensorStation3.png|thumb|none|Sensor console example]] | [[File:SensorStation3.png|thumb|none|Sensor console example]] | ||
The power to the [[sensor]] system is turned on and off using the bottom left button. When the sensors are off or damaged, [[Weapon_Bay|weapon bay]]s and [[transporter]]s cannot function. Those systems depend upon information collected by the sensors. | The power to the [[sensor]] system is turned on and off using the bottom left button. When the sensors are off or damaged, [[Weapon_Bay|weapon bay]]s and [[transporter]]s cannot function. Those systems depend upon information collected by the sensors. | ||
{| class="wikitable" | |||
!On | |||
!Off | |||
|- | |||
|[[File:Pc_PowerOn.png|center|75px]] | |||
|[[File:Pc_PowerOff.png|center|75px]] | |||
|} | |||
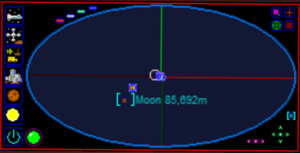
The sensor display is always centered on the [[spacecraft]]. Axis lines indicate the spacecraft's orientation in the display. The bright green line points out the nose of the spacecraft; the dim green line points out the tail. The bright red line points to the right of the spacecraft; the dim red line points to the left. The bright blue line points straight up from the spacecraft; the dim blue line points down. | The sensor display is always centered on the [[spacecraft]]. Axis lines indicate the spacecraft's orientation in the display. The bright green line points out the nose of the spacecraft; the dim green line points out the tail. The bright red line points to the right of the spacecraft; the dim red line points to the left. The bright blue line points straight up from the spacecraft; the dim blue line points down. | ||
| Line 42: | Line 32: | ||
Five green buttons control rotation of the display. The four green arrows rotate the display. The center green button restores top down rotation. | Five green buttons control rotation of the display. The four green arrows rotate the display. The center green button restores top down rotation. | ||
Sensors have a limited range for detecting small objects. The range is determined by the | {| class="wikitable" | ||
!Rotation | |||
!Zoom | |||
|- | |||
|[[File:SensorRotation.png|center|75px]] | |||
|[[File:SensorZoom.png|center|75px]] | |||
|} | |||
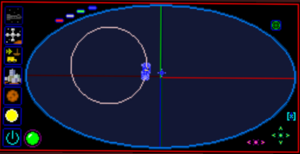
Sensors have a limited range for detecting small objects. The range is determined by the amount of volume allocated to the sensors in the blueprint. The range is depicted on the display screen as a dull green sphere around the spacecraft. Detection of large objects like [[planet]]s, [[moon]]s and [[star]]s is not limited by range. | |||
Small objects that have been detected are displayed using distinctive blips. Planets, moons and stars are displayed as a circle the color of their atmosphere, dirt, or light color respectively. | Small objects that have been detected are displayed using distinctive blips. Planets, moons and stars are displayed as a circle the color of their atmosphere, dirt, or light color respectively. | ||
| Line 58: | Line 56: | ||
===Selection=== | ===Selection=== | ||
[[File:SensorStation5.png|thumb|none|A sensor contact selected.]] | [[File:SensorStation5.png|thumb|none|A sensor contact selected.]] | ||
Objects are selected by clicking on them on the display. The name and range of the selected object is shown on the display in bright blue letters. | Objects are selected by clicking on them on the display. The name and range of the selected object is shown on the display in bright blue letters. | ||
The example above shows a | The example above shows a [[mine]] is selected. It is 3,380 meters away, directly left of the sensor operator's ship. Many other buildings and other starships surround the sensor operator's ship. Another object is seen just off-screen near the bottom, behind and vertically below the ship. | ||
====Selection Details==== | ====Selection Details==== | ||
More information about the selected object may be available by clicking the purple information query button at the top right. | More information about the selected object may be available by clicking the purple information query button at the top right. | ||
{| class="wikitable" | |||
!Display Details | |||
|- | |||
|[[File:DisplayDetailsButton.png|center|50px]] | |||
|} | |||
Details about a [[spacecraft]] will show the following: | Details about a [[spacecraft]] will show the following: | ||
* Spacecraft | * Spacecraft Type | ||
* [[ | * Name | ||
* | * Quality | ||
* Blueprint Class | |||
* Volume | |||
* HP | |||
* Affiliated Empire | |||
* Shield Status | |||
Details about a [[building]] will show the following: | |||
* Regular, Military, or Capital | |||
* Building Type | |||
* Quality | |||
* Volume | |||
* HP | * HP | ||
* | * Affiliated Empire | ||
''Note:'' If the selected building is a [[capitol]], then the building type will be shown as the name of the [[city]] instead. | |||
Details about a [[world]] will show the following: | Details about a [[world]] will show the following: | ||
* World name | * World name | ||
* | * Orbit Zone | ||
* Resources | |||
===Sensor Lock=== | ===Sensor Lock=== | ||
A selected object can be Locked-On using the red cross button at the top right corner. When the sensors are locked-on to a target, an unlock button appears below the lock-on button. | A selected object can be Locked-On using the red cross button at the top right corner. When the sensors are locked-on to a target, an unlock button appears below the lock-on button. | ||
When the sensors are locked-on to an object, a HUD-like red-cross reticle appears in the scene at the location of the object. Crew members at other stations also see the lock-on reticle, enabling the sensor operator to direct fire or otherwise bring attention to a target. Crew members at the [[Helm_Station|helm]], [[Shield_Station|shield station]], [[ | {| class="wikitable" | ||
!Lock | |||
!Unlock | |||
|- | |||
|[[File:LockOnButton.png|center|75px]] | |||
|[[File:UnlockButton.png|center|75px]] | |||
|} | |||
When the sensors are locked-on to an object, a HUD-like red-cross reticle appears in the scene at the location of the object. Crew members at other stations also see the lock-on reticle, enabling the sensor operator to direct fire or otherwise bring attention to a target. Crew members at the [[Helm_Station|helm]], [[Shield_Station|shield station]], [[Weapon_Station|weapon station]], [[Transporter_Station|transporter station]], and [[turret]]s see the lock-on reticle overlayed on the target in their view, even if the object is blocked from sight. | |||
When operating the turrets of a [[spacecraft]], [[troop]]s will prefer the target of the sensor lock. Otherwise, they will fire at other targets within range. | When operating the turrets of a [[spacecraft]], [[troop]]s will prefer the target of the sensor lock. Otherwise, they will fire at other targets within range. | ||
[[Category:Consoles]] | [[Category:Consoles]] | ||
Latest revision as of 13:37, 12 March 2024
| Sensor Station |
|---|

|
Sensors work like a three-dimensional radar to detect objects in space around the spacecraft or building. Sensors provide information vital to the operation of weapon bays and transporters.
The sensor station operator can assist the pilot and the weapon officer by using the sensor's lock-on capability.
Controls are activated by clicking on the console using the hand cursor. Controls also have corresponding keyboard equivalents. Help about using the hand cursor and a table showing the key commands for this station can be found on the Controls#Sensor_Station page.
Console

The power to the sensor system is turned on and off using the bottom left button. When the sensors are off or damaged, weapon bays and transporters cannot function. Those systems depend upon information collected by the sensors.
| On | Off |
|---|---|
 |
 |
The sensor display is always centered on the spacecraft. Axis lines indicate the spacecraft's orientation in the display. The bright green line points out the nose of the spacecraft; the dim green line points out the tail. The bright red line points to the right of the spacecraft; the dim red line points to the left. The bright blue line points straight up from the spacecraft; the dim blue line points down.
Functions
Display magnification and rotation are controlled using buttons at the bottom right of the display.
Three pink buttons control magnification of the display. The pink arrows increase and decrease magnification. The center pink button restores the default magnification.
Five green buttons control rotation of the display. The four green arrows rotate the display. The center green button restores top down rotation.
| Rotation | Zoom |
|---|---|
 |
Sensors have a limited range for detecting small objects. The range is determined by the amount of volume allocated to the sensors in the blueprint. The range is depicted on the display screen as a dull green sphere around the spacecraft. Detection of large objects like planets, moons and stars is not limited by range.
Small objects that have been detected are displayed using distinctive blips. Planets, moons and stars are displayed as a circle the color of their atmosphere, dirt, or light color respectively.
Sensor Icons
| Icon legend |
|---|

The column of buttons at the left is used to declutter the display. Each button toggles the display of a class of objects. The classes of objects that can be displayed are Spacecraft, space stations, Vehicles, Buildings, Planets, and Stars. Planets and stars will show on the display even when they are beyond sensor range; other objects must be within sensor range. The vehicles class includes boats, ground vehicles, aircraft and space fighters.
Selection

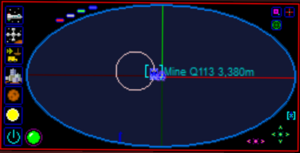
Objects are selected by clicking on them on the display. The name and range of the selected object is shown on the display in bright blue letters.
The example above shows a mine is selected. It is 3,380 meters away, directly left of the sensor operator's ship. Many other buildings and other starships surround the sensor operator's ship. Another object is seen just off-screen near the bottom, behind and vertically below the ship.
Selection Details
More information about the selected object may be available by clicking the purple information query button at the top right.
| Display Details |
|---|
 |
Details about a spacecraft will show the following:
- Spacecraft Type
- Name
- Quality
- Blueprint Class
- Volume
- HP
- Affiliated Empire
- Shield Status
Details about a building will show the following:
- Regular, Military, or Capital
- Building Type
- Quality
- Volume
- HP
- Affiliated Empire
Note: If the selected building is a capitol, then the building type will be shown as the name of the city instead.
Details about a world will show the following:
- World name
- Orbit Zone
- Resources
Sensor Lock
A selected object can be Locked-On using the red cross button at the top right corner. When the sensors are locked-on to a target, an unlock button appears below the lock-on button.
| Lock | Unlock |
|---|---|
 |
 |
When the sensors are locked-on to an object, a HUD-like red-cross reticle appears in the scene at the location of the object. Crew members at other stations also see the lock-on reticle, enabling the sensor operator to direct fire or otherwise bring attention to a target. Crew members at the helm, shield station, weapon station, transporter station, and turrets see the lock-on reticle overlayed on the target in their view, even if the object is blocked from sight.
When operating the turrets of a spacecraft, troops will prefer the target of the sensor lock. Otherwise, they will fire at other targets within range.
