Designer: Difference between revisions
| Line 449: | Line 449: | ||
Grid colors are controlled on the Designer page of the Settings window. | Grid colors are controlled on the Designer page of the Settings window. | ||
Grid visibility can be turned off. The grid plane is always active, regardless of its visibility state. | |||
Grid rounding can be turned on or off, independently of the grid visibility state. | |||
===Grid as a Tool=== | ===Grid as a Tool=== | ||
Revision as of 20:56, 15 July 2020
The Designer is a modeling tool used to design spacecraft and building blueprints.
The Designer Menu page describes each individual menu item.
The Design Parts page describes each individual kind of part.
Architect
The person who creates a design is the architect of the design. The person who creates each part is the architect of that part. Parts retain their architect information with them.
When multiple architects work on the same design, the architect who initiates the designer instance is the architect of the design.
The analysis report for a design lists all architects whose parts are included in a design.
Blueprints
A blueprint is a design that has been analyzed and accepted for use in the game. Blueprints contain all of the information needed to make a functional building or spacecraft, such as its 3D model and design specifications. Blueprints are stored in a universal library where they are accessed by spacecraft and buildings during game play. Blueprints are identified by a unique number, assigned when stored in the library.
Blueprints can be saved onto media items in an avatar's gear. Blank paper and blank disks can each hold only one blueprint. Storage devices can hold varying numbers of blueprints, depending on the device.
Spacecraft, buildings, and storage devices reference their blueprints in the library throughout their lifetimes. Blueprints that are in use by game objects cannot be deleted. When a player deletes a blueprint, it may instead be deactivated in the library, until it is no longer referenced and it can be finally removed.
In the designer and in this wiki, the word blueprint is used generally to refer to any design, whether or not it has been finalized.
Blueprint Exchange
The blueprint exchange provides a place for players to share blueprints. Separate exchanges for spacecraft blueprints and building blueprints are accessed in the game.
At the exchanges, blueprints can be published by architects and they can be purchased by players. Prices are in cronodollars ¢, the money of the game. Cronos are not related to real money. Spacecraft and building blueprints do not cost real money.
Publishing is a way to share blueprints with other players. Publishing terms control the price and who is permitted to use the blueprint.
A blueprint does not have to be published to be used in the game. A blueprint can be saved onto a storage device in your gear, then used to make buildings or spacecraft. Interfaces that request a blueprint know how to find them in your gear.
Designer Access
The designer can be accessed both online and when playing offline solo.
Online Designer
Online, a designer is accessed by going to a design studio building or by accessing a designer station while aboard a spacecraft.
To enter a designer at a design studio, display the Building (F10) window and click on the "Enter" button of a studio. When a studio is "Vacant", you may leave the password box blank or you may enter a password of your choice. The password you enter establishes that studio's password until the studio becomes vacant. To join an "Occupied" design studio, you must enter the password that was established by the first person to enter the studio.
To enter a designer aboard a spacecraft, move to a designer station and enter the station by pressing the E key. Designers aboard a spacecraft are not password protected. Each designer station creates its own designer instance. People who enter the same designer station are placed in the same designer instance. The avatar enters the designer instance and their body does not remain at the station in the ship, like it does with other stations.
Players may work together in the same studio to develop a design. In this case, the first player to enter the vacant studio is registered as the architect and owner of the design.
Offline Designer
When the game is launched, the designer can be entered solo, instead of logging in to the game. Overall program performance is better when designing solo because no server is involved. Once a design is completed solo, it can be saved to a .SoH file. That file can be loaded into the on line designer, for storage in the universal library.
Design Process
General steps to making a design go something like this.
- Adjust design properties to establish goals.
- Create an exterior hull.
- Create one or more rooms inside the hull.
- Cut out doors and windows.
- Create finer model details.
- Apply textures and other effects to finish the surfaces.
- Add details: control stations, berths, lights, display screens, etc.
- Add room voids, paths and barriers.
- Make doors operational.
- Finalize the design.
Designing typically involves creating many parts. Parts include things like hulls, rooms, jigs, lights, display screens, etc.
Check design properties from time to time. It shows an assessment of the design, based on what you are trying to design.
Design Goal
Your goal as an architect is to make beautiful looking designs that are functional in the universe of Hazeron. Emphasis is placed on appearance over technical realism.
Hull sections do not have to be sculpted to form airtight continuous shells where they join each other. This is inefficient and difficult to model. It is much better to butt an engine pylon into the side of the hull, rather than carving a hole so it can make a perfect junction. Carving that hole breaks the side face into many tiny polygons. It is likely unnecessary, unless people are going to walk or see through the opening.
A design does not require the interior to conform to the exterior. Your design may represent a large intricate spacecraft that appears to have many rooms. It is inefficient and unnecessary to create all of the interior rooms and detail that would exist in real life. Like a movie set, only a few key areas inside the hull need to be modeled. This enables the designer to efficiently achieve the look and feel desired, without laborious excess work.
Interior details have no effect on the mass calculation of the design. Rich interior designs are encouraged. There is no performance advantage to making stark minimal interiors.
Be efficient with your designs. There is no point in modeling details that can never be seen. A good example is a cargo hold full of cargo. An inefficient approach would be to build a huge room and fill it with shipping containers. It would be much more efficient to build only an accessible area representative of a cargo hold, with walls modeled and textured to look like stacks of shipping containers. Use those precious faces where they get the most impact; don't waste them.
More parts are better than less. Parts help to manage large 3D models. Rendering information is collected and consolidated efficiently when the OpenGL model is constructed. It makes no difference in the final rendering if the information comes from one part or many.
A key feature that brings together the design is the turbo lift. Turbo lifts work like elevators. They move from one stop to another, at the request of the passengers. Unlike a real elevator, a turbo lift teleports instantly to each stop. This enables separate interior sections of a design to be connected in a way that feels contiguous to players. Turbo lifts also enable separate sections to be interconnected when the geometry to create the passage ways between them might be difficult or impossible to make.
Part Mode vs Face Mode
Parts are composed of faces. Faces have vertices and edges. To edit the faces of one or more selected parts, face mode is enabled. In a typical design session, face mode is enabled and disabled often, whenever the need arises to modify the faces that make up a part.
Actions on the Parts menu operate on whole parts. Most actions on the Parts menu are disabled when face mode is enabled. Some part menu actions are only enabled when one or more parts are selected.
Actions on the Face menu operate on faces of selected parts. Most actions on the Face menu are enabled when face mode is enabled. Textures are applied in face mode.
Geometry
Parts are represented by geometry that can be painted in an OpenGL scene. Geometry of parts is described by their vertices, edges and faces.
Vertices
Vertices contain 3D Cartesian coordinate locations that describe the position of edges and faces. Vertices also contain information needed when rendering. Texture coordinates are stored at vertices. Glow is emitted at vertices.
Render information is interpolated between vertices. Thus, the glow of a vertex will fade off to a neighboring vertex that does not glow.
Vertices also contain an up direction, for lighting calculations. The face menu commands Flatten Vertices and Smooth Vertices operate on vertex up directions.
Edges
Edges are the visible lines that go from one vertex to another to reveal the boundaries of faces. Edges exist for the benefit of the designer, to see the model. Their presence or absence has no effect on the final rendering result.
Faces
Faces are flat surfaces that compose a 3D model. OpenGL paints faces in front of each other depending upon their Z-depth in the scene. This is the essence of how 3D scenes are painted by a computer.
Faces have a front and a back. Faces are not visible from the back in the final rendering result. They can be seen from the back in the designer, if back face visibility is enabled. The object menu command Reverse Faces flips their facing back and forth.
All faces are created equal. A face copied from one part and pasted into another becomes a face of the destination part. It is irrelevant if it came from a hull and gets added to a room. The part is the hull or room; the face is just a face.
Faces do not "know" how they were created. A face created as part of an extrusion is no different from a face that is created individually. The extrusion command merely assembles faces into a desired shape.
Shapes
Shapes use parameter-driven methods to generate faces. Primitive shapes can provide a general starting point for more detailed modeling.
The resulting shape may be modified like any other set of faces. The faces are in no way different than if an architect painstakingly built the same shape using faces. It is typical to generate a quick shape then rip it apart, to use some portion of it, or embellish it to mold it into what you want.
Extrusion

An extrusion is formed by projecting a shape along a straight path. Examples include: rooms, beams.
The creation of an extrusion begins by entering the shape that will be extruded. After the shape is entered, a window presents options to finalize the extrusion. Straight extrusion is made by simply entering the length.
Faces are formed at the sides of the extrusion. Stepping allows the sides to be divided along the length of the extrusion.
When the extrusion is generated, the shape follows a straight line. Both ends of the extrusion are closed.
Steps:
- A point is entered to begin the extrusion shape.
- Subsequent points are entered to describe the extrusion shape.
- A window offers extrusion options.
- Depending on extrusion options, a point may be entered to indicate the height or direction of the extrusion.
Key Commands:
Bbacks up to reenter the previous point requested.Crestarts the action at the beginning.Dindicates completion of the shape.
Sphere Lon/Lat
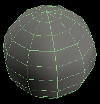
A longitude/latitude sphere is divided into equal divisions of latitude and longitude. The faces are largest at the equator. The faces converge together at the poles.
Creation of a longitude/latitude sphere is described by entering the center point and a point at its radius. After the points are entered, a window presents options to finalize the sphere. Options include number of latitude divisions and number of longitude divisions.
Steps:
- A point is entered at the center of the sphere.
- A point is entered at the radius of the sphere.
- A window offers sphere options.
Key Commands:
Crestarts the action at the beginning.
Sphere Uniform

A uniform sphere is divided uniformly into triangle faces. All triangles are close to the same size.
Creation of a uniform sphere is described by entering the center point and a point at its radius. After the points are entered, a window presents options to finalize the sphere. Options include number of divisions at the equator.
Steps:
- A point is entered at the center of the sphere.
- A point is entered at the radius of the sphere.
- A window offers sphere options.
Key Commands:
Crestarts the action at the beginning.
Spindle

A spindle is created by spinning a shape around an axis. Objects with axial symmetry are created as spindles. Examples include: flying saucer, spool, furniture leg, column, dome, sphere, dinner plate, door knob, dish antenna.
The creation of a spindle begins by entering the shape that will be spun around an axis. After the shape is entered, a window presents options to finalize the spindle. Options include the number of steps around the axis and the choice of axes.
Steps:
- A point is entered to begin the spindle shape.
- Subsequent points are entered to describe the spindle shape.
- A window offers spindle options.
Key Commands:
Bbacks up to reenter the previous point requested.Crestarts the action at the beginning.Dindicates completion of the shape.
Tubing

Tubing is very similar to an extrusion except that the path may be complex, instead of simply extruding along a straight line. When the tubing shape is extruded along the path, corners are mitered appropriately.
Tubing is not just for making water pipes. Tubing is used to make any closed shape that is extruded along a complex path. Examples include: piping, ducts, crown molding, baseboard trim, railroad tracks, hand rails, soffits, wall conforming consoles, base and wall cabinets, and counter tops.
Creation of tubing begins by entering the path along which the tubing will travel. After the path is entered, a window presents options to finalize the tubing.
Circular tubing is made by simply entering the diameter and number of sides for the tube.
Other tubing shapes are created by drawing the cross section shape of the tubing.
After drawing the shape of the tubing cross section, a guide point is entered on the shape.
When the tubing is generated, the shape follows the path along the guide. Both ends of the tubing are closed.
Steps:
- A point is entered to begin the tubing path.
- Subsequent points are entered to describe the tubing path.
- A window offers tubing options.
- Depending on tubing options, a point may be entered to begin the tubing shape.
- Subsequent points are entered to describe the tubing shape.
- Guide point for the tubing shape is entered.
Key Commands:
Bbacks up to reenter the previous point requested.Crestarts the action at the beginning.Ddisplays options for completing the tube.
Jigs
Jigs are found underneath the Part menu button. There are many different types of Jigs, such as Door Jigs, Window Jigs, Launch Tube Jigs, Cutting Jigs, and Decal Jigs. They are created like any other hull or room objects, by selecting the Shape type (Extrusion, Sphere, Tubing, Spindle) and drawing the shape wanted. A physical object is then created and added to the Parts list as a Jig of the type selected.
Jigs are used by positioning the created Jig object between two rooms, or between a hull and room, ensuring that the Jig penetrates both walls. Once this is positioned correctly, select all 3 objects at once using the Parts panel, and then select "Jig Cut" under the Design Menu button. The jig then cuts the walls in the shape of the jig, allowing you to create tube hallways as an example. The cut walls are then converted to the object type of the jig, such as the walls being converted into transparent glass if using a Window Jig, or door objects if using a Door Jig.
Jigs can be used in order to create different types of objects, exits or walls between two rooms or the interior and exterior of a design. For example, the Door Jig creates a door between whatever rooms the Jig is placed between. The Window Jig creates a Window between the rooms, while the Launch Tube and Cutting jigs just create holes between the hull and room and cut the faces of each side, respectively.
All jigs create faces between the two walls that they penetrate, in order to give walls thickness and prevent you from seeing any back-faces.
Origin
At the center of the design space is a yellow marker, drawn as three intersecting yellow lines. It does not move when the design grid moves. The immovable yellow marker is the true origin (0,0,0) location of the design space. That is the point at which a spacecraft will pivot, when it maneuvers. The origin is the insertion point when placing a building, that determines the altitude of the building on the terrain.
Obstructions and Voids
Obstruction data describes the solid shape of the design and its accessible inside areas. The obstruction model is created automatically by analyzing the design geometry.
A lot of processing effort is required to maintain the model so it is not done automatically with every modification to the design. The obstruction model is updated using the Blueprint, Refresh Obstructions menu option.
The obstruction model is created from hull and landing gear parts. Each state of landing gear is represented so it's obstruction shape changes when the gear is extended. The obstruction model envelops each part individually. To get the best fitting obstruction model, it is beneficial to split elaborate hull parts into multiple simpler hull parts.
The obstruction model includes a margin around hull and landing gear parts. This helps to prevent the eye camera of players from getting close enough to see inside, which breaks the illusion of solidity.
The hull and landing gear parts describe a solid shape. Voids are used to carve out the spaces accessible to players. Room parts exist to create the desired appearance but it is the voids that really determine where people can go.
Hull voids exclude or erase portions of the obstruction model. Depressions and cavities formed in a single hull part may result in unwanted obstructions. For example, a thruster nozzle made from a single conical hull part would be obstructed inside the cone; a hull void could be used to permit movement into the cone. Gravity inside hull voids matches the environment around the spacecraft or building. Hull voids are also integral to describing a hull door; see the section on doors.
Room voids designate areas accessible to players by excluding areas inside the obstruction model. Room voids offer a choice of internal gravity options. Room voids also enable access to the cargo hold by people in the room. Options for room void gravity and hold access are configured when the void is created. Room void properties can be changed afterwards using Part, Properties, Room Void Gravity and Hold Access.
Voids may be associated with a state of a part. Doors associate a room void with their open state, to create a passage when opened.
Rules for Voids
- Faces of a void must form an airtight shell.
- Faces of a void must be flat, not bent. Use triangles to make bumpy voids. Do not bend quads or poly faces.
- Use voids sparingly and strictly limit the number of faces. Overall size of a void is not a factor; number of faces is the critical resource that must be minimized.
- Multiple voids with few faces is strongly preferred over elaborate voids with many faces. It is far better to intersect two long boxes than to make a single cross shaped void.
- Voids may overlap other voids, allowing movement from one void to the next. A small amount of overlap is more reliable than trying to abut them perfectly and it's easier to draw.
- Hull voids should extend outside the obstruction model so there is no ambiguity when entering or exiting. Excess hull void that extends beyond the obstruction model is expected and it has no negative consequence.
The obstruction model cannot be seen. It exists somewhat like an electrical field around the design model.
The presence of the obstruction model can be felt by moving around the design. The menu toggle Blueprint, Solids Obstruct Movement must be checked to bump against the obstruction model.
Part Association
Association is when a part references another part by its id number.
Associations are created using the Part, Associate Parts command. Associations are removed using the Part, Dissociate Parts.
Part associations are used by the following parts.
Barriers
Barriers can be associated with a state of a door or landing gear. This determines which barriers are obstructions when the door or landing gear is operated.
It is ok to associate more than one barrier with a state of a door or landing gear.
Berth Name Decals
Berth name decals are associated with a berth. This determines which name to display on the decal. Unassigned is displayed when the berth is not assigned.
It is ok to associate more than one berth name decal to the same berth.
FTL Drive Service Panels
FTL drive service panel is associated with an engineer station. This determines which FTL drive the service panel accesses.
It is ok to associate more than one service panel with the same system.
Hull Voids
Hull voids are associated with the open state of a door, when making operable hull doors. This determines which voids become accessible when the door is opened.
Association of a hull void and a room void to a door causes it to become a hull door. This enables the interior room void and the exterior hull void to become accessible at once, presumably overlapping each other so a person can move from one void to the other.
Hull voids may be associated with any state of a door or landing gear to make access to the void dependent upon them.
It is ok to associate more than one path or void with a single state of a part.
Room Life Support Status Panels
Room life support status panel is associated with a room void. This determines which room's air pressure reading appears on the panel.
It is ok to associate more than one life support status panel with a single room.
Room Voids
Room voids are associated with the open state of a door, when making operable doors. This determines which voids become accessible when the door is opened.
Room voids may be associated with any state of a door or landing gear to make access to the void dependent upon them.
It is ok to associate more than one path or void with a single state of a part.
Walk Paths and Ladder Paths
Walk paths and ladder paths are associated with the open state of a door, when making operable doors. This guides NPCs to find their way through the door when it is open.
Paths may be associated with any state of a door or landing gear to make access to the void dependent upon those states.
It is ok to associate more than one path or void with a single state of a part.
Weapon Service Panels
Weapon service panel is associated with a fire control station. This determines which weapon the service panel accesses.
It is ok to associate more than one service panel with the same system.
Walk Paths
In order for NPCs to successfully move around the interior of a design with multiple rooms.
The walk paths need to be above the floor, hip height is usually good. Each end of a walk path is referred to as a node, NPCs will need to always have a clear line to the nearest walk path node in whatever room they are in, or else they will get stuck. Walk paths need to form a full network where each walk path has to start where another ends, so that an NPC that is standing in one room can go to their nearest walk path node and then path through the network to their destination room.
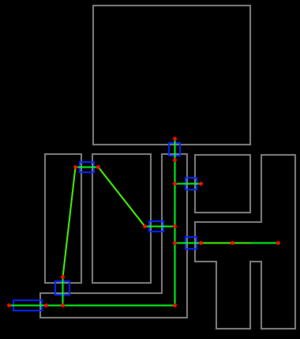
NPC pathing strategy is fairly primitive. When they want to go somewhere, they look for the closest path end point to them that they can move straight to without obstructions. Similar logic is used to find the path node closest to the destination. There must be a complete end-to-end chain of path segments from beginning to end, from there on.
Common Mistakes
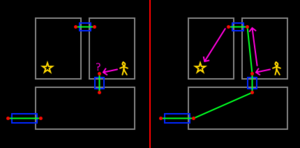
Common mistake 1. NPCs will always start by going to the nearest node in their room when they need to path to another room. If the NPC cannot find a path to its destination from its nearest walk path node it will be unable to go anywhere. A walk path is needed to connect the doors across the room from each other, so the NPC can find the closest node at the nearby door, then follow the path to the room containing the destination, then walk across the room straight to destination's room.
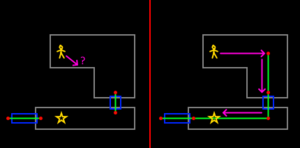
Common mistake 2. NPCs will need a clear line to the nearest node in their room, or they will be unable to leave it the room.
Finalize
When a design is complete, it undergoes a finalizing process to insure that it is usable for its intended purpose. The result of the finalize process is presented to the architect in a list. The list may contain green notes, amber warnings and red errors.
- Green notes are merely informative, providing information about the finalize process.
- Amber warnings bring attention to things that may indicate a design error or oversight was made. Warnings do not prevent a design from being finalized.
- Red errors highlight aspects of the design that must be changed before it can be finalized.
In the on line designer, a design that finalizes with no errors can be saved into the universal library. Once saved to the library, a unique blueprint number is assigned and reported back to the architect. Then the design can be built in the game and it can be published in the appropriate exchange.
In the solo designer, a design that finalizes with no errors reports that it could be saved to the library if it was finalized on line.
Designer Interface
The designer interface is dominated by a first person 3D view of the design space. It is in this space that the design will appear as it is created. The mouse pointer is used in this view to select things. The mouse is also used to drag the selected things from one place to another, to move or copy them.
Hover the mouse pointer over most buttons and controls to see a tool tip. Tool tips on buttons explain their function and they sometimes reveal features that are not obvious at first. The tool tips on some buttons change, depending on current conditions.
Grid
The grid is a tool for drawing. It is more like a ruler, a measuring tool, than the lines on a piece of graph paper, a static media. The architect will move and rotate the grid many times during a typical design session, as needed, wherever it helps to draw.
Coordinate Systems

An understanding of coordinate systems is helpful to use the grid effectively.
Real numbers extend to infinity, both positive and negative. This can be represented visually as a number line. Whole numbers are placed at regular intervals along the line. Fractional numbers fall proportionally between the whole numbers. i.e. 1.25 is 25% of the value between 1 and 2.
A number can be expressed in units of length, such as meters, in either the positive or negative direction, along the number line. The number is its ordinal value or ordinate.
That defines a one-dimensional vector. The absolute value of the number is its length. The sign of the number indicates the direction, either positive or negative.
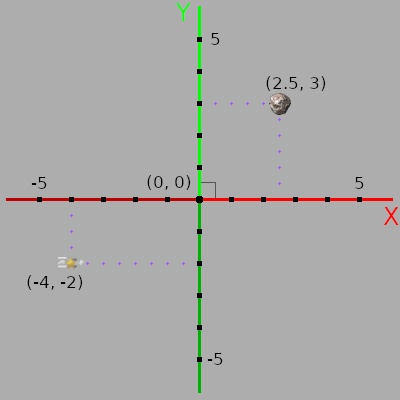
A Cartesian coordinate system is created when two number lines are placed perpendicular to each other, so they cross at 0. In a Cartesian coordinate system, each number line is called an axis. They are named X and Y.
A plane is formed by the intersection of the two axes, called the XY plane. At any location in the plane, the X ordinate and the Y ordinate can be determined by dropping the point perpendicular to the respective axes. Knowing that, we can plot any location in the plane if we know the X ordinate and the Y ordinate at the location.
The combination of ordinates is called coordinates. Coordinates are expressed using notation like this (X, Y). In the picture, the coordinates of the starship are (-4, -2). The coordinates of the asteroid are (2.5, 3). Coordinates (0,0) are called the origin, because that is where the numbers originate, or begin, for all axes.
This is a 2 dimensional (2D) coordinate system because it expresses locations as dimensions measured along two axes.
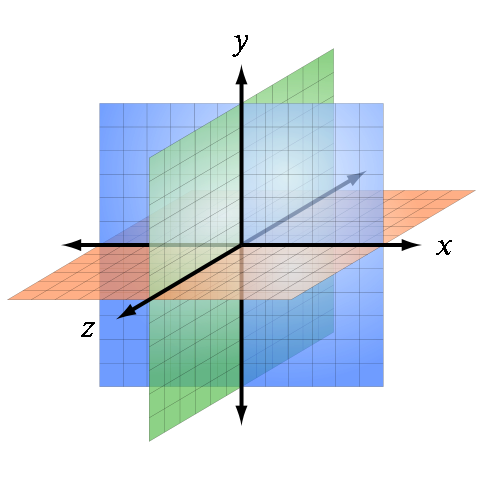
A third axis can be added perpendicular to each of the other two axes. It is named Z.
Using the coordinates of three axes, any location in space can be described. This is a 3 dimensional (3D) coordinate system because it expresses locations as dimensions measured along three axes. 3D coordinates are expressed like this (X, Y, Z).
Visible Grid
The visible grid represents a 3D coordinate system. Axis lines are bright in the positive direction and dim in the negative direction. The position of X is shown as a red line. The position of Y is shown as a green line. The position of Z is shown as a blue line.
X and Y lines are marked at the ends with the axis name and direction.
The XY plane contains lines parallel to the X and Y axes, forming a visible grid. Regular interval spacing between the grid lines is controlled by a combo box control on the reference tool bar.
Grid colors are controlled on the Designer page of the Settings window.
Grid visibility can be turned off. The grid plane is always active, regardless of its visibility state.
Grid rounding can be turned on or off, independently of the grid visibility state.
Grid as a Tool
All drawing takes place in the 3D coordinate system of the grid. Position the grid to draw anywhere in the drawing, using coordinates relative to the subject matter.
Coordinates entered into the input tool bar are relative to the grid.
Free hand drawing happens in the plane of the grid. In the view, the location of the mouse pointer is projected straight into the screen until it intersects the XY plane of the grid, regardless of the visibility state of the grid. If Snap to Grid is enabled, that location will be rounded to the nearest grid line intersection. Various snapping switches can be enabled. Grid rounding behavior is overridden when the mouse pointer snaps to existing geometry.
Most drawing commands terminate/replace the current drawing command; grid positioning commands suspend the current drawing command instead. Whenever a drawing command is requesting point input, a grid positioning command can be invoked. Upon termination of the grid positioning command, the suspended drawing command will resume its request for point input.
When selected geometry is copied to the clipboard, the geometry on the clipboard is in the coordinate space of the grid, at the time of the copy.
When geometry is pasted from the clipboard, it is placed in the coordinate space of the grid, at its location at the time of the paste.
For example, move the grid to the center of a selected part. Copy that part to the clipboard. Move the grid. Paste the clipboard; it will be added at the new location of the grid. Use Paste At to place more than one of them.
Menu Bar

At the top of the designer interface is a menu bar. Most functions of the program can be accessed using the menu bar.
See designer menu for a list of the items on the menu bar.
Input Tool Bar

The Input Tool Bar appears below the menu bar, at the left. It can be moved by dragging the dotted grip at the left end. Tool tips on the buttons explain their function.
Design Properties
Equivalent to the Blueprint, Properties menu item.
Refresh Obstructions
Equivalent to the Blueprint, Refresh Obstructions menu item.
Solids Obstruct Movement
Equivalent to the Blueprint, Solids Obstruct Movment menu item.
Gravity
Equivalent to the Blueprint, Gravity On/Off menu item.
Preview
Equivalent to the Blueprint, Preview On/Off menu item.
Preview Sun Position
Equivalent to the Blueprint, Preview Settings menu item.
Construct Building
Equivalent to the Blueprint, Preview Place Building menu item.
Preview People
Equivalent to the Blueprint, Preview People menu item.
Coordinate Input
Many design commands will ask the architect to enter a 3D point location. A location can then be entered by clicking with the mouse pointer in the view window. Alternatively, locations can be entered into the coordinate input box, at the end of the Input Tool Bar.
Cartesian coordinates are entered as X,Y,Z values, which are positive or negative offsets along the X, Y and Z axes. Omitted values are 0. e.g. 1,,2 is the same as 1,0,2; p2 is the same as p2,0,0; a,3 is the same as a0,3,0.
Polar coordinates are entered as pD,A,I values: D is distance from the origin; A is angle around the Z axis, positive counterclockwise and negative clockwise; I is the angle of inclination off the XY plane, positive above and negative below.
Coordinates are relative to the location and orientation of the grid unless specified otherwise.
Coordinates prefixed with a are absolute. Absolute coordinates are relative to the native coordinate system of the design, ignoring the grid. e.g. a1.25,2.3,-4.5 or ap2.5,-30,10. The native coordinate system is indicated by an immovable yellow indicator.
Distances are interpreted in units depending upon the unit of measure setting.
Angles are entered in degrees.
Rotating
Some design commands will ask the architect to enter a rotation value. e.g. rotate selected objects.
When responding to a request for rotation, input into the Coordinate Input box is interpreted as 3D rotation angles around the X, Y and Z axes. e.g. To rotate 45 degrees around the Z axis, enter 0,0,45, or simply ,,45.
Scaling
Some design commands will ask the architect to enter a scale value. e.g. stretch selected objects.
When responding to a request for scaling, input into the Coordinate Input box is interpreted as 3D stretch factors along the X, Y and Z axes. e.g. To double the overall size, enter 2,2,2; to reduce the X dimension by half, enter .5,1,1.
Move/Copy
When no design command is active, the coordinate input box can be used to move or copy the objects that are selected.
- Move parts by entering a coordinate. The objects that are selected will be moved using the vector entered.
- Copy parts by entering a coordinate while holding the
Ctrlkey. The objects that are selected will be copied and moved using the vector entered.
Reference Tool Bar

The Reference Tool Bar appears below the menu bar, to the right of the input tool bar. It can be moved by dragging the dotted grip at the left end.
Face Mode
Equivalent to the Face, Face Mode menu item.
Isolate Parts
Equivalent to the Face, Isolate Parts menu item.
Find Vertices
Equivalent to the Helpers, Find Vertices menu item.
Find Edges
Equivalent to the Helpers, Find Edges menu item.
Find Faces
Equivalent to the Helpers, Find Faces menu item.
Show Edges
Equivalent to the View, Show Edges menu item.
Show Faces
Equivalent to the View, Show Faces menu item.
Show Back Faces
Equivalent to the View, Show Back Faces menu item.
Move Grid
Equivalent to the Helpers, Move Grid menu item.
XY Grid
Equivalent to the Helpers, XY Grid menu item.
XZ Grid
Equivalent to the Helpers, XZ Grid menu item.
YZ Grid
Equivalent to the Helpers, YZ Grid menu item.
Position Grid
Equivalent to the Helpers, Position Grid menu item.
Grid Spacing
Changes the spacing between lines in the grid.
Show Grid
Equivalent to the Helpers, Show Grid menu item.
Grid Follows Work
Equivalent to the Helpers, Grid Follows Work menu item.
Snap to Grid
Equivalent to the Helpers, Snap to Grid menu item.
Snap to Edges
Equivalent to the Helpers, Snap to Edges menu item.
Snap to Vertices
Equivalent to the Helpers, Snap to Vertices menu item.
Coordinate Feedback
Shows coordinates relevant to the current drawing operation.
When responding to coordinate input, the coordinate at the mouse pointer position is shown, relative to the grid. That coordinate is usually the location where the mouse pointer hits the grid, though it may change if the pointer snaps to an existing object.
When dragging objects using the mouse pointer, the offset of the drag is shown. Dragging usually occurs in the grid plane, though it may change if the pointer snaps to an existing object.
Parts Window
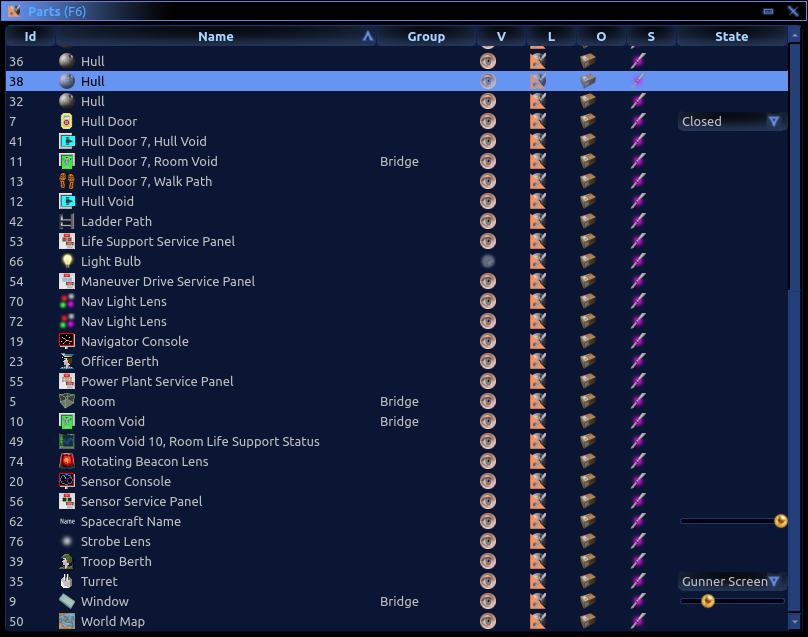
The Parts window is displayed using the F6 key or the menu. It is typically docked at the right side of the designer window.
The parts list contains every part that is in the current design. This includes hull objects, imported meshes, rooms, berths, etc. This allows you to easily see everything within the design at once, and also provides buttons for toggling the visibility of each part, as well as other part properties.
The parts list is also useful for selecting parts and deleting parts.
Id Column
Every part in a design is assigned a unique id number. Part id numbers may range from 1 to 65,535.
Part id numbers are not preserved when copied and pasted between designs. Parts are assigned new ids when pasted into a design.
Name Column
The name column starts with an icon that indicates the kind of the part.
The icon is followed by a text name assigned to the part. Names are assigned by the designer based on the type and properties of the part.
Group Column
The group column shows the name of the group assigned to each part.
Select one or more parts and right-click to assign them to a group. Group names are chosen by the architect. Parts are assigned to groups as needed.
Groups organize parts together.
In building and spacecraft designs, groups define the rooms.
- Group names become room names in the final blueprint, if the group contains a room void.
- Room voids in the same group have the same internal air pressure.
- All parts in the same group are lit similarly, according to room lighting.
The Hull group is reserved for hull parts; it is never considered to be a room. Hull parts are lit according to the external environment of the building or spacecraft.
- Parts with a blank group name are grouped with the hull, for lighting.
In fence and wall blueprints, two groups are required: Post and Section.
The Post group appears at each post of the final fence. The blueprint origin is where the post is placed on the ground, with +Z up according to the direction of gravity at the placement location. The post is oriented to align with the fence line on the ground.
The Section group forms the fence between the posts, from post location to post location. A section of fence is designed from the origin, extending along the +X axis, with +Z up at each end. The +X extent of the section defines the typical post spacing of the fence.
When placed on a world, the fence section is morphed to fit between two post locations. Post locations may vary in altitude and gravity direction and their spacing may vary from the typical section that is drawn.
- The section origin, at Z=0, is placed at the first post.
- The section +X extent, at Z=0, is placed at the second post.
- The section geometry stretches accordingly.
Visibility Column
Shows and controls the visibility state of parts.
Parts can be made invisible to simplify the design view. Invisible parts are not selected when using the mouse in the scene. Editing functions do not operate on invisible parts.
Left click to toggle the visibility of the selected parts. Right-click to choose visibility from a menu.
Making a part invisible does not exclude it from the final design. Invisible parts are included in the final design.
Lock Column
Shows and controls the locked state of parts.
Lock parts to protect them from accidental editing. The locked state of parts has no effect in the final design.
Left click to toggle the lock of the selected parts. Right-click to choose the locked or unlocked state from a menu.
Omit Column
Shows and controls whether a part is omitted from the final design.
Omit parts to prevent them from being included in the final design. Omitted parts are excluded from the design analysis report. Some parts are always omitted; they cannot be included.
Excluded parts can be useful for reference purposes, as a way to keep images or geometry in the design that are not intended to be part of the final design. Parts that exist only as design tools are omitted regardless of this setting, e.g. door jigs.
Seal Column
Shows and controls whether a part is sealed.
Parts remember who their architect was. Seal parts to prevent other architects from editing them in face mode. Only the architect of a part can seal or unseal the part.
Sealed parts can be used in part mode like other whole parts. They can be moved, stretched, rotated, copied to the clipboard and saved into files. Whole part editing operations are mostly disabled when a sealed part is selected, to protect the design of the part from changes.
A sealed part can be used as a jig but it cannot be cut using a jig.
Only the architect of a sealed part can enter face mode when the part is selected. This prevents individual faces of sealed parts from being modified or copied to the clipboard by other architects.
The design report lists all architects whose parts are included in a design.
State Column
Shows the current state of parts that can have multiple states, such as doors that can be open or closed.
On some kinds of parts, a slide bar is shown for adjusting the transparency of the part.
Texture Wrapper Window
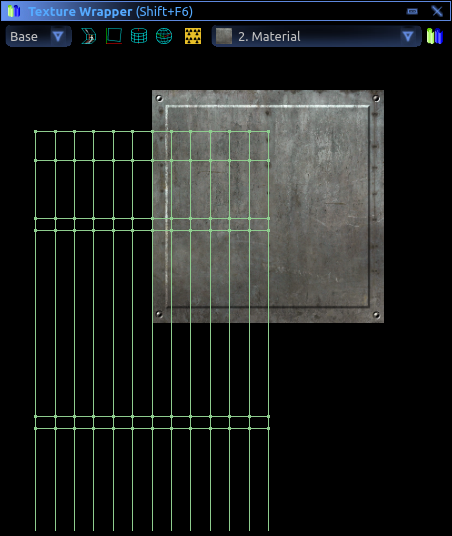
The Texture Wrapper window is displayed using the Shift+F6 key or the menu. It can be docked stacked on top of the parts window; tabs will appear at the bottom, to choose between them.
The texture wrapper is only used in face mode.
Texture wrapper is a tool for positioning textures on faces. Texture wrapper only operates on faces that are selected. The designer must be in face mode to select faces.
The viewing area shows the texture applied to the faces. Edge lines of the faces are painted where the texture is mapped to them. The viewing area is blank when the texture differs between the selected faces.
A combo box contains the current texture palette. Change the texture of faces by choosing a texture in the combo box.
Unwrap
Uunwraps the faces onto the texture. A window presents options for unwrapping the faces. A usage tip explains grid plane usage.
Plane Projection
Unwraps the faces onto the texture. Textures are mapped onto faces using a plane projection. Position of the grid plane affects the result. A usage tip explains grid plane usage.
Cylindrical Projection
Unwraps the faces onto the texture. Textures are mapped onto faces using a cylindrical projection. Position of the grid plane affects the result. A usage tip explains grid plane usage.
Spherical Projection
Unwraps the faces onto the texture. Textures are mapped onto faces using a spherical projection. Position of the grid plane affects the result. A usage tip explains grid plane usage.
Repeat
Toggles a repeating pattern of the texture image, to aid in positioning. All textures repeat, regardless of this setting.
The viewing area only shows faces that are selected in the scene. Vertices are highlighted when selected. Vertex selection matches the vertices selected in the scene. Vertices can be selected/deselected in the scene also.
Mouse Controls
- Left click an unselected vertex to select it.
- Ctrl+left click a vertex to toggle its selection.
- Left click a selected vertex, then drag, to move all selected vertices.
- Left click in empty space to deselect all vertices; then drag, to drag a box to select vertices.
- Ctrl+left click in empty space, then drag, to drag a box to toggle selection of vertices.
- Right click then drag to pan the display.
- Wheel to change view magnification.
- Ctrl+wheel to change view magnification in larger steps.
Key Commands
Aselects all vertices.Ggrabs selected vertices to move them.Rrotates selected vertices.Sstretches selected vertices.Xconstraint. While moving, moves in X only. While stretching, stretches in X only.Yconstraint. While moving, moves in Y only. While stretching, stretches in Y only.
Spacecraft Design
For spacecraft designer specific information, see the Spacecraft Design page.
Building Design
For building designer specific information, see the Building Design page.