Road: Difference between revisions
mNo edit summary |
(Pressurized) |
||
| (18 intermediate revisions by 2 users not shown) | |||
| Line 1: | Line 1: | ||
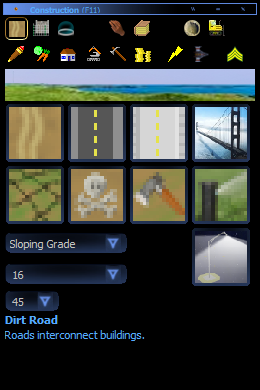
Roads are required to | [[file:RoadConstruction.png|frame|right|Construction window's roads category.]] | ||
'''Roads''' are required to connect buildings so they can trade. The type of road makes no difference to the buildings. | |||
After placing a road, the next road is started from the end of the previous road. This can be cancelled by pressing the <code>space</code> key or re-selecting the road type in the construction window. | |||
Roads in general require little labor to build, but extreme changes in terrain elevation take additional labor to level the ground. | |||
In addition, there are special ''areas''. These are placed just like roads, however are used to modify terrain in some special way. They do not block construction of buildings or other roads. These are listed below. | |||
On the construction window, you'll see three dropdowns under the buttons, going from top to bottom: | |||
# The first specifies if the road is ''Sloping'', and thus slopes from the start terrain level to the terrain at the end, or if the road is ''Level'', where it flattens the land all the way to the end. The left/right arrow keys can be used to switch between these on the fly. | |||
# The second dropdown specifies the road ''width''. This is self-explanatory and can be changed up to a maximum of 80 meters and a minimum of 8. Be aware that sloping and level grades have separate width settings, with the default for sloping being 16m while the default for level grade is 52m. | |||
# The third and final dropdown specifies the ''angle snap'' when holding shift while placing a road or area. This is useful for creating clean connections and placements. | |||
Be aware that the selected construction material (Logs, Metal, etc) has no effect on roads and the type of road selected is the only factor which matters. In addition, the "Make product" and blueprint parts of the UI are not applicable to roads. Bridges are an exception, however a bridge is essentially just a building. | |||
==Road Types== | |||
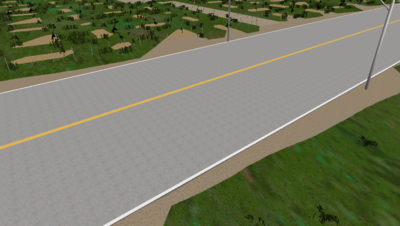
[[File:ConcreteRoad.png|thumb|right|400px|How a standard concrete road looks when built.]] | |||
===Roads=== | |||
{|style="text-align:center;width:100px;" class="wikitable" | |||
|A basic dirt road. Requires no materials.||An asphalt road. Exactly like concrete roads, but they're darker in color and require oil. They also cannot be built in the super hot environments found on worlds in the inferno orbit zone.||A concrete road. Requires stone. Stone is automatically fetched from the environment. | |||
|- | |||
|[[File:BRoadDirt.png|200px]]||[[File:BRoadAsphalt.png|200px]]||[[File:BRoadConcrete.png|200px]] | |||
|} | |||
===Areas=== | |||
{|style="text-align:center;width:100px;" class="wikitable" | |||
|The Grade Area tool. Is used to flatten huge chunks of land. Does not affect foliage.||The Defoliate Area tool. Used to clear trees, shrubs, and ground cover.||The Clear Area tool. Used to mow ground cover, and clear trees and shrubs.||The Irrigate Area tool. Grows local trees, mowed ground cover and shrubs. | |||
|- | |||
|[[File:GradeArea.png|200px]]||[[File:DefoliateArea.png|200px]]||[[File:ClearArea.png|200px]]||[[File:IrrigateArea.png|200px]] | |||
|} | |||
==Trivia== | |||
In the past, a fourth type of road existed called [[File:BRoadPressurized.png]]''Pressurized Road''. These provided the same protection as buildings with breathable HEV-safe interiors, and let you walk around a hazardous-environment city without an [[EV Suit]]. They had physical enclosures representing the pressurized area. | |||
__NOTOC__ | |||
== | |||
[[Category:Buildings]] | [[Category:Buildings]] | ||
Latest revision as of 12:27, 10 March 2024

Roads are required to connect buildings so they can trade. The type of road makes no difference to the buildings.
After placing a road, the next road is started from the end of the previous road. This can be cancelled by pressing the space key or re-selecting the road type in the construction window.
Roads in general require little labor to build, but extreme changes in terrain elevation take additional labor to level the ground.
In addition, there are special areas. These are placed just like roads, however are used to modify terrain in some special way. They do not block construction of buildings or other roads. These are listed below.
On the construction window, you'll see three dropdowns under the buttons, going from top to bottom:
- The first specifies if the road is Sloping, and thus slopes from the start terrain level to the terrain at the end, or if the road is Level, where it flattens the land all the way to the end. The left/right arrow keys can be used to switch between these on the fly.
- The second dropdown specifies the road width. This is self-explanatory and can be changed up to a maximum of 80 meters and a minimum of 8. Be aware that sloping and level grades have separate width settings, with the default for sloping being 16m while the default for level grade is 52m.
- The third and final dropdown specifies the angle snap when holding shift while placing a road or area. This is useful for creating clean connections and placements.
Be aware that the selected construction material (Logs, Metal, etc) has no effect on roads and the type of road selected is the only factor which matters. In addition, the "Make product" and blueprint parts of the UI are not applicable to roads. Bridges are an exception, however a bridge is essentially just a building.
Road Types

Roads
Areas
Trivia
In the past, a fourth type of road existed called ![]() Pressurized Road. These provided the same protection as buildings with breathable HEV-safe interiors, and let you walk around a hazardous-environment city without an EV Suit. They had physical enclosures representing the pressurized area.
Pressurized Road. These provided the same protection as buildings with breathable HEV-safe interiors, and let you walk around a hazardous-environment city without an EV Suit. They had physical enclosures representing the pressurized area.


